SSL Security You Can Bank On at GoDaddy.com Flexible Cloud Hosting from GoDaddy.com, starting at $.05 per hour!
Showing posts with label Windows. Show all posts

Saturday, July 7, 2012

Full Screen Mode of C++ in Windows 7


The problem is that turbo C is
very old DOS program. It's better to move on to an up to date compiler
like visual C++ Express which is free and you certainly would have a
better experience.


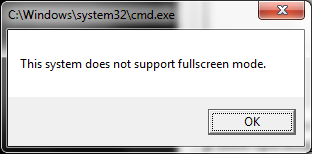
When you try to run Turbo C++ IDE on latest version of windows like Windows7 or Vista, you may get the error message that


The system does not support full screen mode. Choose close to terminate the application.
Anyway if you are up with turbo C++ and used to it, I have 3 tricks to run it full screen on windows7
and vista. The tricks can be simply classified based on which works on all versions of windows7 and one which only works under Windows 7 Enterprise, Windows 7 Professional, and Windows 7 Ultimate.

Technique 1

Log on to windows7 in safe mode.
In safe mode the application running capabilities of an operating system is low and this mode is used as trouble fixing for OS. But this method is much simpler and you only need to log on to safe mode by
pressing F8 on start up.

By summarizing the steps:
  1. Install turbo C++
  2. Start windows7 in safe mode.
  3. Execute turbo C++

    Technique 2

    By Disabling your graphics adapter.  This trick is done by just uninstalling the graphics driver. To do that
    1. Right click on My Computer, click Properties
    2. Select Device manager->Display Adapters
    3. Identify the display adapter of your computer, and uninstall.
    You should try this trick only if you do not use your computer for Graphic related operations like
    playing multimedia games.By this trick graphics would look vulgar but you can run C++ in full screen.


    Technique3

    By using DOSBox software. It is an 
    open source DOS emulator for BeOS, Linux, Mac OS X, OS/2, and Windows.
    This tool is primarily intended to play DOS games on windows7 but here
    we can use it run turbo C++ in Full screen mode.

    1. Download DOSBox frome here. (for windows)
    2. Install and run the DOSBox.
    3. Now a command prompt type window will appear. We need to mount TC folder. 
                  Just type “mount c: c:/tc” and press enter. 
    • Assumed that Turbo C++ is installed in C drive and TC folders located at C:\TC
    • You may get a message that 'Drive C is mounted as local directory C:/TC\'
    • Change the directory to C/BIN/tc.exe. To do that, please follow the steps as shown in the below screen shot.
    http://itankur.files.wordpress.com/2011/02/declare.png

    Now the Turbo C++ will open in DOSBox. Press ALT+ENTER  to toggle between full screen and mini screen.


    By applying the above 3 tricks, you can run C compiler on full screen mode in Windows 7.


    Thanks for Visit Here Like Us on Facebook.
    If Any Problem, Ask in Comments Follow US on Twitter.

    Thursday, December 15, 2011

    Windows Section


    Find Here all tutorials related with Windows like Windows XP, Windows 7, Windows 8.

    Windows XP

    Windows 8


    Thanks for Visit Here Like Us on Facebook.
    If Any Problem, Ask in Comments Follow US on Twitter.

    Tuesday, November 29, 2011

    Set VPN Connection in Windows XP [PIC TUT]


    As in last tutorial we introduced the How to Set VPN Connection in Windows XP but in this tutorial, You will get PIC TUTORIAL.

    Follow Steps....

    • Open Control Panel and Choose Create a new connection.
    • Fill and Submit question steps.
    •  Select Connect to the network at my workplace and Click on Next
    •  Select Virtual Private Network Connection and Click on Next.
    •  Enter your Company Name and Click Next.
    •  Choose a public connection option.
    •  Identify VPN by Server Name OR IP Address.
    •  Select Availability of Connection according to you and Click on Next.
    •  Finalize your VPN Connection.

    Monday, November 28, 2011

    Set VPN Connection in Windows XP


    What is VPN Connection?

    A Virtual Private Network (VPN) is a network that uses primarily public telecommunication infrastructure, such as the Internet, to provide remote offices OR traveling users access to a central organization network.

    Set VPN Connection in Windows XP

    Follow the Steps....
    • Open the Windows Control Panel.
    • then, Open the Network Connections item in Control Panel. A list of existing dial-up and LAN connections will appear.
    • Choose the 'Create a New Connection' item from the left-hand side of the Windows. The Windows XP New Connection Wizard will appear on the screen.
    • First Click Next to begin the wizard, then choose the 'Connect to the Network at my workplace' item from the list and click on Next.
    • On the Network Connection page of the wizard, choose the 'Virtual Private Network Connection' option and click Next.
    • Enter a name for the new VPN Connections in the 'Company Name' field and click Next. The name of an actual business.
    • Choose an option on the 'Public Network. The default option, 'Automatically Dial This Initial Connection' can be used if the the VPN connection will always be initiated when the computer is not already connected to the Internet. Otherwise, choose the 'Do not dial the initial connection' option. This option requires that the public Internet Connection be established first, before this new VPN connection will be initiated.
    • Enter the name OR IP adress of the VPN remote access server to connect to, and click Next. Company Network Administrators will provide this information.
    • Choose an option on the "Connection Availability" screen and click Next. The default option, 'My Use Only,' ensure that Windows will make this new connection available only to the currently logged on users. Otherwise, choose the 'Anyone's use option'.
    • At the last, Click Finish to complete the wizard. The new VPN connection information has been saved.


      Sunday, October 30, 2011

      Create Picture Password in Windows 8


      As we all know that the Technology is taking new heights day by day similarly Windows 8 giving the new technology in their upcoming version of Windows 8. Create Picture Password in your System to protect the un-authorized user to accessing your data.

      We have a Video Tutorial for it. 

      Open it from here which is embed in our BlogTube Template.

      Saturday, October 29, 2011

      How to Install Windows 8 from USB Flash Drive


      Round about stating of June Windows 8 leaked before it's launching and Developer Preview has been out for download but you can install it from USB Flash Drive. It has 2 methods to install it.


      System Requirements for this task.
      • Minimum 4GB removable USB Flash Drive.
      • Windows 8 iso file (Download from here)
      • Operating System Windows XP SP2, SP3 OR Windows Vista OR Windows 7 (32-bit OR 64-bit) 


      Ist Method

      First we have to make our drive bootable using CMD Command Prompt in Ist Method.
      1. Run the DISKPART utility by typing DISKPART at the Start Menu Search Box.

          2. Run the list disk command to check the status of your choice.


         3. Run select disk 1 where the 1 is actually the corresponding number of your USB Drive.

         4. Then Run Clean.


         5. When Once the thumb drive is clean, then Run create partition primary.


         6. Now you have to make the partition active by entering active.


         7. Run the command format fs=NTFS quick to format the USB Flash Drive.


         8. Run the assign command which gives USB Drive a Drive Letter.


         9. Now, Extract the Windows 8 iso file using the WinRAR utility.


         10. Copy the conents of the file from extracted iso file to USB Flash Drive.


      IInd Method

      This method is easier than previous one we will use Windows 7 DVD/USB Download Tool to Install windows 8.


         1. First Download Windows 7 DVD/USB Download Tool from here and Install it.

         2. Run the Tool and in the SOURCE FILE Box, type the name and path of your Windows 8 iso file, OR Click BROWSE and select the file from the OPEN dialog box. Click NEXT.


         3. Select USB DEVICE to create a copy on a USB Flash Drive.


         4. If you are copying the file to a USB Flash drive, select your USB Device in the Drop-Down list and Click BEGIN COPYING.


      Only Step 4 were required and your bootable USB Flash Drive would be ready.


      Once you completed will see the USB Flash Drive with the icon as shown in the image below.


      After, You have created a Bootable USB Flash Drive change the BOOT order in BIOS to BOOT from your USB Drive first.

        Thursday, October 27, 2011

        Install Windows 8 on VmWare Virtual Machine


        As Windows 7 proved very hit mostly for every environment but some where un-compertible for other software but now you can run Windows 8 on virtual machine VmWare.

        This is also a leak related with Microsoft's Product and environment. This might be tedious task related with Installing and Re-Installing of Windows 8 on VmWare Virtual Machine.


        Firstly System Requirements should be same like Windows 7 as following below....
        • Minimum 1 Ghz Processor of 32 Bit (x86).
        • Minimum 1 GB RAM of 32-bit OR 2 GB RAM of 64-bit.
        • Minimum 16 GB free space should be available in Harddisk for 32-bit and 20 GB space for 64-bit.

         Follow the steps....
        • First you should have the Windows 8 which you installed in your Virtual Machine.
        • Download VmWare  Player from here  ELSE from here and Install it.
        • Click on Create a New Virtual Machine option from list.


        • Now Choose Installer disk image file (iso) and browse for the Windows 8 image file.

        • In Next Menu select Microsoft Windows as Operating System and Windows 7 (x64) but if you are installing Windows 8 (x64) OR select Windows 7 if you are installing 32 bit version.

        • In the Next Menu leave  the Windows Product Key empty and just enter the name and password (it's optional)

        • Set the name of the Virtual Machine (according yourself)  and set the location where you want to install it (select where you have round about OR minimum 40 GB free space when installing Windows 8 x64)

        •  After it, Enter the maximum disk-size, perfer to keep it minimum as 40 GB.

        • After it, Click on Customize Hardware and modify the memory if installing Windows 8 (x64). Keep the memory minimum as 2 GB. You could also change the number of cores depending on your processor.

        •  At the End, Click on Finish and your Windows 8 installation will start on Virtual Machine.

        Saturday, October 22, 2011

        Windows 8 Build 7989 Boot Screen in Windows 7


        Get the Windows 8 Build 7989 booting screen in Windows 7 OS because it has been leaked. So now you can use it's booting screen in Old OS.

        Boot Screen


        This Boot Screen has three kinds of variants....
        1. Variant 1 Without Ugly Fish
        2. Variant 1 With Ugly Fish
        3. Variant 2 Without Ugly Fish

        Follow the Steps to install the Boot Screen of Windows 8
        1. Download the Windows 7 Boot Updater from here
        2. Unpack all files from archive
        3. Open Program > Click on Files > Load Boot Skin
        4. Navigate to .bs7 file
        5. Select anyone which you like 
        6. Click on Apply

        You are done

        Wednesday, October 19, 2011

        Windows 8 Official Wallpapers


        Windows 8 Wallpaper is going to be very awesome and very unique with HD quality and also we all are looking for the Windows 8 Official Wallpapers for our desktop, lapi etc. So wait is over now, we are giving here round about 25 Official Windows 8 Wallpapers in free.

        Want to Download? Just open wallpaper > Right click and click on Save Image

        • Windows 8 Wallpaper


        • Windows 8 Wallpaper

        • Windows 8 Wallpaper

        • Windows 8 Wallpaper


        • Windows 8 Wallpaper
        • Windows 8 Wallpaper

        • Windows 8 Wallpaper
         
        • Windows 8 Wallpaper
        • Windows 8 Wallpaper
        • Windows 8 Wallpaper
          • Windows 8 Wallpaper
            • Windows 8 Wallpaper
              • Windows 8 Wallpaper
                • Windows 8 Wallpaper
                  • Windows 8 Wallpaper
                    • Windows 8 Wallpaper
                      • Windows 8 Wallpaper
                        • Windows 8 Wallpaper
                           
                          • Windows 8 Wallpaper

                          • Windows 8 Wallpaper
                          • Windows 8 Wallpaper
                            • Windows 8 Wallpaper
                              • Windows 8 Wallpaper
                                • Windows 8 Wallpaper

                                Related Posts Plugin for WordPress, Blogger...
                                Twitter Delicious Facebook Digg Stumbleupon Favorites More

                                 
                                $1.99 Domains* at GoDaddy.com
                                Home | Advertise Here | About Author
                                Blogger Wordpress Gadgets

                                About Author

                                Hi....! I'm Hemant Verma, Graduate in Computer Applications in 2012, Love to Make Blogger Hacks and Like to Play with HTML and a Business Man. Read More....
                                Demanding Tut